
Introduction: The Unsaid Issue of Leather Care
Leather and extreme heat are a no go. High heat causes the natural oils to evaporate which in turn leads to actual cracking, burning, or a very stiff out of the ordinary finish. Also this is a issue for those which want to do a perfect restoration but at the same time avoid damaging that which is expensive.
This in depth guide is your go to source for at home leather jacket press and de-wrinkle care. We will go over the gentlest of techniques put forth by the professionals which include the use of steam and the proper way to use an iron on low. By doing so not only will you remove those pesky creases but also you will preserve the natural feel and rich look of the leather which in turn will extend the life and legend of your favorite jacket.
The Golden Rule: Why You Should Avoid High Heat
Before we get into the “how-to”, we should cover the basic material aspects of leather. What we have with genuine leather jacket is basically a treated hide which contains natural oils and fibers that in turn give it that which it is known for flexibility and texture.
In high heat which is anything over 120°F (49°C) the moisture in natural oils within the leather is forced out which causes it to break down, lose its flexibility and in fact this damage is permanent. Also high heat may melt that which has been used as a protective finish causing you to have an area that is shiny or burned in appearance and will not go back to normal. That is why you should never put a leather jacket in a very hot dryer or roll out a standard high heat iron on it. What we see is that proper care and patience are the key for at home use of your leather products.
3. Phase 1: Safe, No Heat Methods
Gentle at first. Usually the leather’s fibers just require time and a gentle nudge to return to their natural smooth state. I would try the non-iron methods which are your first defense against light wrinkles and creases.
Method 1: The Damp Bathroom Plan.
This out of all methods is the easiest and most safe which is why we recommend it for mild wrinkles from short term storage or travel. A steamy shower is a great solution which as it slowly introduces moisture back into the leather’s fibers allows them to gently relax without the risk of high heat damage.
- Preparation: Hang out your leather jacket on a broad shouldered sturdy wooden or padded hanger. Wire hangers will leave new sharp crease marks on the shoulders.
- Hang in the Bathroom: Place the jacket in a corner of the bathroom which is a way that it won’t get wet from the shower spray, but at the same time near enough to fill up with steam. Behind the bathroom door or on a high hook is a good idea.
- Steam and Wait: Run for a shower of 15-20 minutes with the bathroom door and window shut to contain the steam. Once the steam has built up turn off the water and leave the jacket out for a further 30 minutes.
- Smooth and Condition: After taking off the jacket let them air out and remove any which may still be present by hand. Once it is fully dry apply a good quality leather conditioner to replace any lost moisture and keep the leather supple.
Method 2: The Break and Wait Technique
For certain hard to reach creases which form in pocket flaps and at the hem the flat out technique is a great option. This method includes the use of even pressure to push the leather fibers back into a flat position.
- Lay Flat: Place the jacket on a clean flat hard surface like a table or wood floor. Iron out the wrinkles with your hands and see to it that the creases are as flat as they can be.
- Apply Weight: Cover the area with clean smooth cotton cloth or heavy brown craft paper. Also place on top of the damaged area some heavy flat items like hard covered books, thick encyclopedias, or large cutting boards.
- Wait: Leave the item to sit for a few hours at the very least. For best results leave it over night. The constant pressure will work the wrinkles out.
- Final Inspection: Once the weights are out the leather should be very flat. If necessary follow up with a conditioner.
Phase 2: Safe Ironing of a Bomber Leather Jackets (The Advanced Method).
If at first non-heat methods don’t remove your deeper wrinkles, try a short ironing session instead. Great care must be taken with this option which is the most immediate use of heat and has the greatest risk of damage. This method should always be used as a last resort for genuine leather.
Essential Materials Check-List
To for sure have a successful and safe ironing session collect these items first:.
- Iron: Must use the lowest heat setting (e.g. Silk or Wool). Steam function should be turned off.
- Ironing Board: A level surface.
- Pressing Cloth/Protective Barrier: A clean and dry white cotton pillowcase, towel, or thick pressing cloth. This is what you should use.
- Leather Conditioner: Immediately after the fact.
Step-by-Step Ironing Instructions
- Clean the Surface: Gently brush your jacket with a dry cloth to remove surface dust and debris. Ironing over dirt will embed it in the leather.
- Set the Iron: Turn on the lowest heat setting for the iron (they may mark it for silk or wool). Also it is key that you turn the steam out of the equation and do not use it. Steam may cause leather to stain.
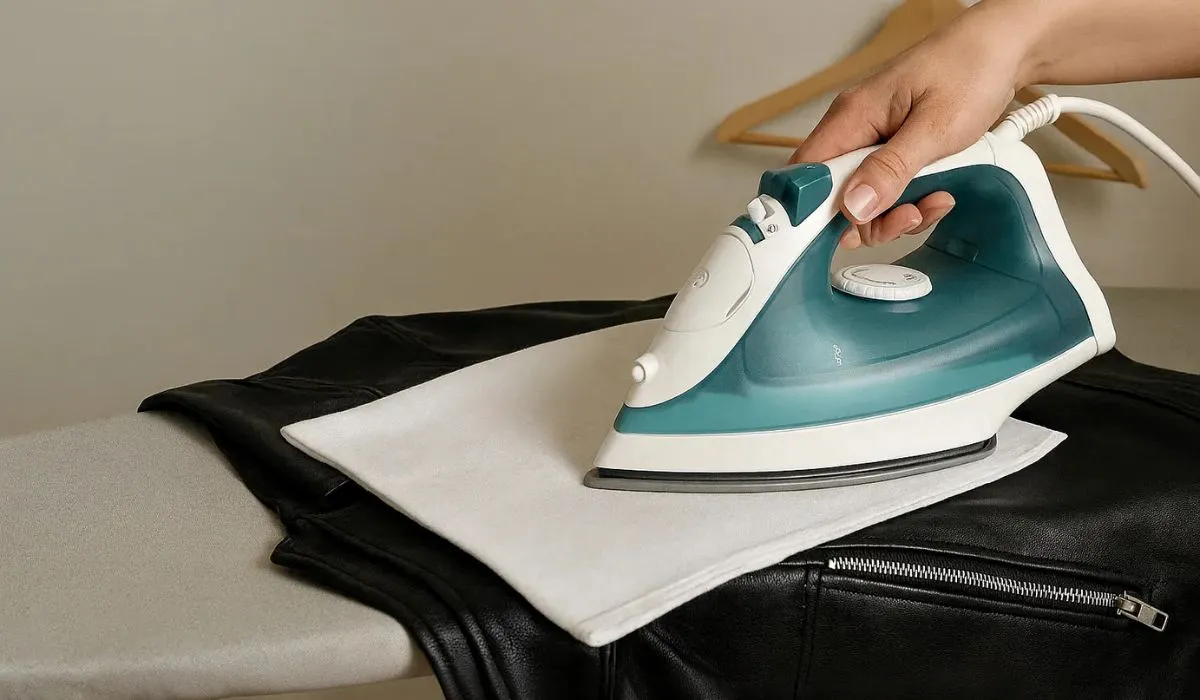
- Prepare the Section: Place the wrinkled area of the jacket flat on the ironing board. Put the thick cotton pressing cloth completely over the leather section which you are going to press. The iron must not touch the leather directly.
- Patch Test: Before you use the full scale version, do a test run on a small out of the way area like the inside of a sleeve or inner collar. Check for color change, shrinkage, or textural differences. If it does fine go ahead.
- Press Gently and Quickly: While the cloth is in place, put the iron down on it which is a gentle action. Do not drag the iron around. Instead press down for 3 to 5 seconds, then lift the iron right up and move it to the next area. This is a pressing motion which is different from ironing.
This patient approach allows the heat to break in the cloth and soften the leather before it burns out.
- Cool Down: Once a section is completed pop the piece onto the strong hanger and let it acclimatize to room temp for at least 30 minutes before storage or wear. The leather requires time to adjust into its new smooth form.
- The Essential Aftercare: Once you remove the jacket from the cooling source the leather will have expelled some of its natural moisture through the heat. With a soft clean cloth apply a large amount of leather conditioner. Pay special attention to the areas which you pressed. This is a very important step in getting back the leather’s moisture balance which in turn will promote the health of the leather in the long term.
The best approach is to prevent wrinkles from happening in the first place. Which also means that proper storage is the key to protecting your investment.
Aftercare and Prevention: Reducing the Appearance of Wrinkles.
- Use the Right Hanger: Always use a wide shouldered wooden or padded hanger for your leather jacket. This will prevent the sharp creases that thin wire hangers cause and which also doesn’t support the shoulder structure.
- Give it Space: In a space in the closet that is large enough to move around in, store your jacket. If you put it between other items in the closet it may get crumpled and develop wrinkles.
- Condition Regularly: Apply a biannual to seasonal leather conditioning which is of high quality. Well moisturized leather is flexible and supple and thus is much less to develop creases and cracks than is dry and stiff leather.
- Travel Smart: When out of town use a breathable garment bag and put the jacket flat in the suitcase if you can. If you have to fold it up, roll it gently with tissue paper in the sleeves and body.
Through patient care, use of low heat, and application of a protective barrier, you may successfully remove those pesky wrinkles from your leather jacket which in turn will keep your classic piece looking great for years to come.
(FAQs) About Pressing Leather Jackets
Q1. What is the safest temperature to iron a genuine leather jacket?
A. Always start with the lowest heat setting out which is around 110°C 230°F and also put a cloth between the iron and the leather to prevent scorch marks or shine marks.
Q2. Can you steam a leather jacket?
A. Sure when you do which is to take a steam iron and set it to low and put it at least 6 inches away from the leather to reduce wrinkles yet avoid damage or dry out the leather.
Q3. How to remove creases from a leather jacket?
A. In a steam filled bathroom place the jacket or put it on a low heat iron with a barrier cloth. Allow it to cool first do not apply direct heat or fold it right away.
Q4. How to apply leather conditioner to a jacket?
A. Use a soft cloth to apply a little conditioner in circular motions over the whole area, leave it on for 10 to 15 minutes, then with a dry rag out work the finish to be smooth.
Q5. Is the process different for suede or faux leather jackets?
A. Yes. For Suede a brush and a special cleaner is what you’ll use and stay away from water and conditioners. As for Faux leather a damp cloth with mild soap is what works best, also avoid the use of conditioners which may damage the material.
Q6. Why do black leather jackets remain a classic in fashion?
A. Because of how they do it all versatility, durability and style. Black leather jackets pair with anything, they are a staple which you can wear for years and which never goes out of fashion — thus a classic piece for every generation.